Last time we talked about live bait and discussed the hesitations some people have with putting something living on a hook. A possible introduction to the fishing method without using living creatures is the use of cut bait. Cut bait has been around for about as long as fishing has been a thought.
While any form of “meat” can be used as cut bait, you’ll quickly find some options work far better than others. Many of the tried and true old-timers will have special recipes that they swear by. The newer anglers will sit by in aw, watching these trial by error masters reel in beast after beast.
The best tip anyone can give you is to be creative. Different baits will evoke different responses in fish depending on locations, water temperatures, and a hundred other variables. The biggest significance AJ and I have seen is the effect fishing pressures have caused.
If you fish a small lake that averages 100 anglers a week, each using chicken livers marinated in cherry jello and garlic, you will probably not get a single bite the day you go. Alternately, show up with a bag of freshly caught bluegills that you cut waterside and you might catch a record number of cats.
So, how do you start fishing with cut bait?
First, let’s discuss exactly what cut bait means.
Any meat you cut to put on a fishing hook is going to qualify as cut bait. Some will be readily available where you’re fishing. Some will require a bit of hunting at the start of your adventure. And other forms will require a bit of investment at the local deli, grocery store, or tackle shop. Remember in the last article how we discussed all your options for live bait? Well, the good news is that any of those products can be sufficient for your cut bait fishing quest. Add to that list a variety of meats that many anglers have found to be effective and you’re going to have a huge arsenal to choose from.
- Chicken Livers
- Chicken Thighs
- Chicken Breast
- Alligator Meat
- Nutria
- Boar Entrails
- Hotdogs
- Spam
- Vienna Sausages
One of the tricks AJ and I like to use is to start out with live bait. After a period of swimming or floating around on our hook, your live bait is likely to no longer be lively. This is especially true with bait that has had a few run-ins with predators. At this point, AJ and I will typically pull the live bait from our hooks, cut it up into one of three formats and toss it back out as cut bait.
How do we cut up our bait?
Cuts will depend on the size and type of fish you choose to use.
Your choice will depend on the bait you’ll be using, the fish you intend to target, and the area you choose to fish in. When you use the processed options (chicken, hotdogs, spam, etc.) you’re not really going to be concerned about cuts. You’ll simply cut strips or chunks off in the desired size and slap the pieces on your hook. When you choose to use fish, you’ll have more to consider.
Certain precautions are necessary depending on the piece of fish you use.
Fish are especially cautious of sharp objects that may indicate a potential threat. A good habit to get into when fishing with cut bait is to remove the fins. The spines on the fins are designed to poke the mouth of predators as they get attacked. By removing them you increase your odds of a solid strike that will improve your hookup ratio.
Some fish are primarily attracted to the smells of oils and blood. Gar and catfish are two particularly good examples of this. By cutting your fish into quarters and leaving the intestines with the cut meat you can improve the bait’s draw. The intestines can be left in place so the current will slowly draw the blood and waste out of the bait essentially chumming the water. Another option is to attach the intestines to the hook along with the meat to slow the distribution rate. Either way, the intestines will produce a stronger draw for many of the more predatory fish you are probably targeting.
Do body parts make a difference?
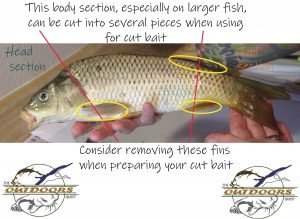
Many people choose to use the heads of their cut bait. While you need to be especially cautious of the sharp appendages that are often attached to the head, you can be confident in the strength of the oils that will inevitably seep out of the bait.
The core of the body can be cut into multiple pieces depending on the size of the bait you need and the size of the fish you’re looking to catch.
While there are some anglers that use the tail of the bait, it can be exceptionally difficult because of the shape and likelihood of the attacking fish getting poked by the fin spines. As a beginner angler, I would recommend staying away from the tail fin for now.
Other precautions will be helpful no matter what piece of bait you choose.
No matter what type of fish you choose to use for your bait, make sure you check your hook for scales before casting your line. A single scale, caught on the hook, can prevent the hook from penetrating the attacking fish’s mouth when you attempt to set the hook.
When at all possible, put the hook below the spine. The bones will help secure the hook and reduce the risk of the meat being pulled off the hook without resistance.
If you’re feeling particularly adventurous, get yourself a piece of gauze. The gauze tube for finger splints works rather well. Chop up the meat and intestines together to create a mush-like texture. Stuff the mush into your tube gauze and attach it to your hook. The oils will slowly seep out of the mixture and pull meat particles with it. Basically, you’ll be chumming the water and drawing your target fish in.
So, you know what cut bait you’re using, but how do you rig it?
The setups discussed for live bait will work quite well. The fish finder (Carolina rig), knocker rig, or hook and bobber will work quite well for the cut bait methods. You can simply replace the live bait with a piece of cut bait.
But how about a few other options for you?
The drop shot
Setup:
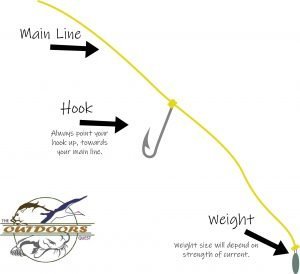
You will use the palomar knot or the dropper loop knot to attach your hook to the mainline. It is your choice as to if you’re going to put a slip bobber on the mainline above your hook. Make sure you leave about 2-3 feet of tag line below your hook. At the bottom of your tagline, you’ll attach your weight. Make sure you set the weight at the proper distance from your hook to keep the bait floating above the brush and debris settled on the bottom of the waterway. If you have any leftover line, cut it off then attach your cut bait.
Uses:
This is a great method for getting your bait down, close to the bottom of the waterway, without leaving it scooting across all the debris. It provides your bait with a bit of movement by setting it in the lowest water column where a bit of current will give it the action needed to get the attention of visual eaters.
Advantages:
By keeping the bait in the current you’ll get the advantage of the oils being disbursed along the current’s path while still keeping it close to the bottom of your waterway where the larger fish tend to congregate.
Precautions:
You will want to pay a bit of attention to your line. The bite will often be rather subtle. If you don’t notice the first taster bite, you can easily lose your chance when the fish takes that second, more confident, bite that strips your bait from your hook. It is also important to give consideration to the type of weight you are using. There are specific weights designed for drop shots and there are multiple weights that work well for drop shots. Other weights, however, will create more headaches than successes for you.
Floating Rig
Setup:
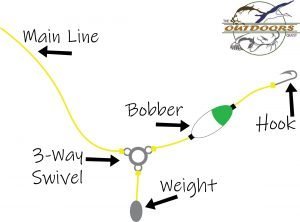
You will put a float on your mainline. Attach a 3-way swivel about 1-2 feet below your float. On one of the other points of the 3-way swivel, you’ll attach a leader line with a weight on the opposite end. This leader line will be about 3-4 feet long. On the point of the 3-way swivel that is still exposed, you’ll attach a lead line with your hook. This lead line will need to be about 6 inches to a foot long. Make sure you don’t leave your lead line for the hook any longer than this or you’ll get the bait tangled up too easily.
Uses:
These floating rigs are a great method for keeping your bait close to the floor of your waterway without actually dragging your bait on the ground. With your weight attached on a separate line, you can ensure that (should you get hung up) you’re most likely to break off the weight rather than your hook. This is especially important should you get snagged on something while fighting your fish.
Advantages:
Getting hung up on trash, tree branches, sunken vessels, plants, etc. is a fact of life when your fishing. The part of your line closest to the floor of the water is the portion that is most likely to get snagged. If your weight gets tangled, no major loss. You have a small amount of line so your line is not likely to injure animals or tangle other anglers’ lines. Your weight is typically smooth and rather solid so you are not likely to get it caught on any of the wildlife where they would become injured or ensnared.
When you get a bite your hook is between you and your weight so you are going to be more likely to sense the bite immediately. This will help improve your hook-up ratios. Best of all, if you have to break off to escape the snag, you’re typically going to still have your bait and hook which, if you’re fighting a fish, means you’re also going to still have your fish.
Precautions:
Choice of weight is especially important. In heavy currents, you’re going to want a heavier weight to keep the bait from floating downstream. If you’re fishing around a lot of debris you’re going to want to choose a smoother weight that is less likely to get tangled (egg sinkers can be a good choice for this).
Santee Rig
Setup:
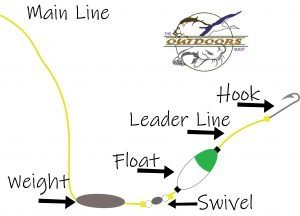
You will attach a weight to your mainline with 4-6 feet of mainline on the tag end of your knot for the weight. Then set a float onto your line about 2-3 feet past your weight. Finally, you’ll tie your hook to the end of the line, about 6 inches to a foot past the float.
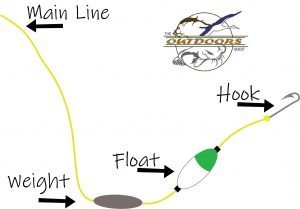
An alternate method to this is to attach a sliding weight to your mainline then tie a swivel to the end of your line. You’ll then attach a leader line to the other end of the swivel that is about 4 feet long. You attach your float to this leader line then tie off the end to a hook. Some anglers prefer to fish with leader lines, some prefer to minimize supplies. It is completely up to you to decide what your preference will be.
Uses:
I have found these types of rigs to be especially good around heavy underwater growth. Plant life can be thick and difficult to move the bait through, but the floating rig will allow the bait to sit above the plant growth. The weight and the bobber will, typically, be so well concealed by the growth that the fish swimming by won’t even notice their presence.
Advantages:
Fish aren’t prone to eating bait that they have to hunt for. They are more interested in eating when the opportunity arises. It’s your job, as the angler, to provide them with that opportunity. Remember how we talked about catfish sitting in wait and watching for a bait fish to pass by in the New Angler’s Intro to Catfishing? This is one of those situations where you’re presenting them with a can’t resist type opportunity. Placing the food at the water level they’re swimming at puts that food right in front of their face. The presentation alone is often enough to encourage them to at least take a taste.
Precautions:
If you opt to use the swivel method, be cautious of the test strength for your mainline as well as your leader line. I typically recommend using a lower test strength for your leader line than what you have on your mainline. This way, if you get tangled up and must break off, you’re more likely to break at the leader line leaving less gear behind and fewer dangers for the animals nearby.
And, just for good measure, consider a mixture of baits…
High-Low Rig
Setup:
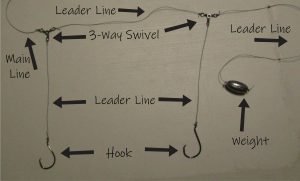
The preferred method is to tie a hook to your mainline. You can use the palomar knot or the dropper loop knot. Make sure you have at least 3 feet of line on your tag end. About 6 inches to a foot further down the line you’ll tie a second hook on. I recommend keeping your knots consistent. Finally, tie a weight to the end of your tagline. A bank sinker or pyramid weight can work very well for this setup, but remember to always choose your weight based on your water and target fish.
Uses:
This setup works incredibly well for almost any fishing environment. Small streams and rivers (especially near bridges and steep dropoffs), ponds and lakes (target structure as much as possible), and even ocean fishing (it’s particularly popular for surf fishing).
Advantages:
You are not always going to know precisely where your target fish are going to want to eat. When you’re fishing with a single hook setup you’re forced to experiment over and over again with different depths trying to determine where the fish are going to bite. With this setup, you can present the bait at multiple depths at the same time. You’re increasing your odds of getting a bite and reducing your search times trying to find the depths your fish are sitting at.
Another opportunity that this setup provides for you is variety. You can provide your target fish with multiple forms of bait so that you can test the waters and figure out what type of bait the fish are interested in eating today.
Precautions:
More hooks means more chances of catching a snag. If you run your loops for your hooks too large, you’re likely to tangle the hooks. If you choose to use live bait mixed with your cut bait make sure you stick to limited mobility type live baits. Choose worms, crickets, etc. rather than shad, bluegill, or minnows for your live bait.
